


CHM 1032C FSCJ Conductivity Against Volume of NaOH Worksheet
Question Description
Materials
- conductivity probe
- 100 mL graduated cylinder
- 0.01 g weighing scale
- 500 mL water or soda bottles
- dropper or transfer pipet
- distilled water
- solid lye, solid sodium hydroxide (NaOH)
- household white vinegar (diluted acetic acid (CH3COOH)) with unknown concentration
Procedure
Part 1 – Creating the Base Solution
- Wear eye/face and hand protection for sodium hydroxide is extremely harmful and caustic. If it feels soapy on your skin, that isn’t soap, its your skin peeling away. Rinse it off immediately. Use your good sense.
- Sodium hydroxide (NaOH) is hygroscopic. Place about 3 g in the oven at 300°F to drive off the water and dry it out. You’re drying it so that the mass that you weigh does not contain water and thus your weight is accurately only containing NaOH.
- Weigh an empty, clean, and dried 500 mL soda bottle. Measure two times 100.0 (=200.0 total) mL volumes with your graduated cylinder into the soda bottle and mark the 200 mL level with a sharpie. Weigh the bottle and subtract the weights and calibrate the volume at the mark using the temperature and density of distilled water as performed in Lab #1. You’ve just created a calibrated volumetric bottle. Its “ok” if your actual volume of water at the mark is 198.3, 202.8, or 200.2 mL. Make note of the actual volume and you can adjust for the volumes later in the computations of molarity. Once calibrated, pour out and disgard about half of the distilled water.
- Calculate the mass of NaOH required to make 200 mL of a 1.00 M NaOH solution, or:
- Weigh approximately the mass calculated of NaOH and make note of it. You don’t have to weigh the “exact” amount. What’s more important is you make note of the final mass, to the proper significant figures, of NaOH that gets weighed and delivered to the solution.
- Pour your weighed and noted mass of NaOH in the soda bottle, making sure to rinse the weighing cup three times into the soda bottle to make sure every molecule of NaOH gets into the calibrated bottle.
- Fill the soda bottle with distilled water to the sharpie mark whatever milliliters it calibrates to. This is your 1.00 M NaOH base solution, or 1.18, 0.971, or 0.913 M NaOH solution, whatever it calculates out to, and make note of that molarity. If you pour over the mark, you’ll have to start over from Step #4 with a emptied and rinsed soda bottle.
- As a final note, an analytical chemist would take this a step further by titrating the NaOH solution just made against a well characterized solution of potassium hydrogen phthalate (KHP for short but not molecularly correct) which is an acid. This would standardize the NaOH base solution and, if titrated volumetrically, properly, tell the analytical chemist the molarity of the NaOH base solution to 4 significant figures. We will not go that far for this level of chemistry but its definitely done for upper level chemistry courses.
Part 2 – Titrating the Unknown Acid
- Normally, we’d load a buret (burette) with the 1.00 M standardized NaOH solution and titrate the unknown acid down below. However, since burets are expensive, we’re going to calibrate about a milliliter volume of a dropper to precisely deliver known incremental volumes to the acid. It won’t be as accurate as using a buret, but its the best we can do given our budget.
- Fill the cleaned dropper with about 1 mL of distilled water. Make sure there is no air bubbles in the water or air gap near the dropper tip. Mark the water level with a sharpie. Weigh the dropper to 0.01 g precision. Disgard the water in the dropper and weight it to 0.01 g. This is the volume of solution you’ll be delivering to your acid during the titration. Use the temperature and density of the distilled water to determine the actual volume delivered from that mark as you did in Lab #1. Make note of that calibrated volumetric dropper. All successive volumes delivered during the titration must not have any bubbles in the 1 mL, have no air gap at the tip, and must be filled to the marked sharpie level. This tends towards consistency and precision and reduces error of the experiment.
- Place 10.0 mL of vinegar in a cup. You should calibrate this volume also prior to measuring the 10 mL vinegar as in Lab #1 with distilled water. Add about 70 mL of distilled water to the cup to ensure its deep enough to cover the wire sensors of the conductivity sensor and yet dilute enough to not overwhelme the conductivity probe during the last few titrations. You want to make sure the sensor is properly emmersed in your solution. Take note of the initial conductivity at 0 mL base added.
- Load your dropper to the mark ensuring no air gaps and deliver that volume just as you did when you calibrated the dropper. Add that volume of base to your acid solution. Stir the base into the acid using the conductivity probe as a stir bar. Stir in one direction for a few seconds then the other then let the proble settle into the measurement. You might have the average the readings over 10 seconds or so if the sensor doesn’t settle on a single reading. Mark both the volume of base added and the conductivity measurement below.
- Its important to make note of the accrued or running total of the volume of base added. For instance, lets say, your mark calibrates to 1.03 mL, your first reading will be at 0 mL, then your 2nd at 1.03, 3rd at 2.06, 4th at 3.09 mL, etc. and so forth. This is important because you’ll need to track the total amount of base added at each step to the reaction vessel, the cup, in order to track what is going on with the total reaction in the cup. You’ll stop at around 15.0 to 20.0 mL base delivered to the acid.
| # | Accrued Volume of NaOH added (mL) | Conductivity Measurement (µS/cm) |
| 1. | ||
| 2. | ||
| 3. | ||
| 4. | ||
| 5. | ||
| 6. | ||
| 7. | ||
| 8. | ||
| 9. | ||
| 10. | ||
| 11. | ||
| 12. | ||
| 13. | ||
| 14. | ||
| 15. | ||
| 16. | ||
| 17. | ||
| 18. | ||
| 19. | ||
| 20. |
Analysis
- Hit the Save button below to save your titration data to the database.
- Type the above data into MS Excel with the volume of NaOH added under Column A and the Conductivity Measurements under Column B. Plot the raw data to a Scatter plot.
- If you’ve done everything correctly, you should see a corner where the trend takes a dramatic change in slope. To the left of the corner is where the acetic acid predominated and to the right is where the sodium hydroxide predominated. And the species that dominated set the charge and mobility characteristics of the solution for the conductivity probe to measure. An example is below:
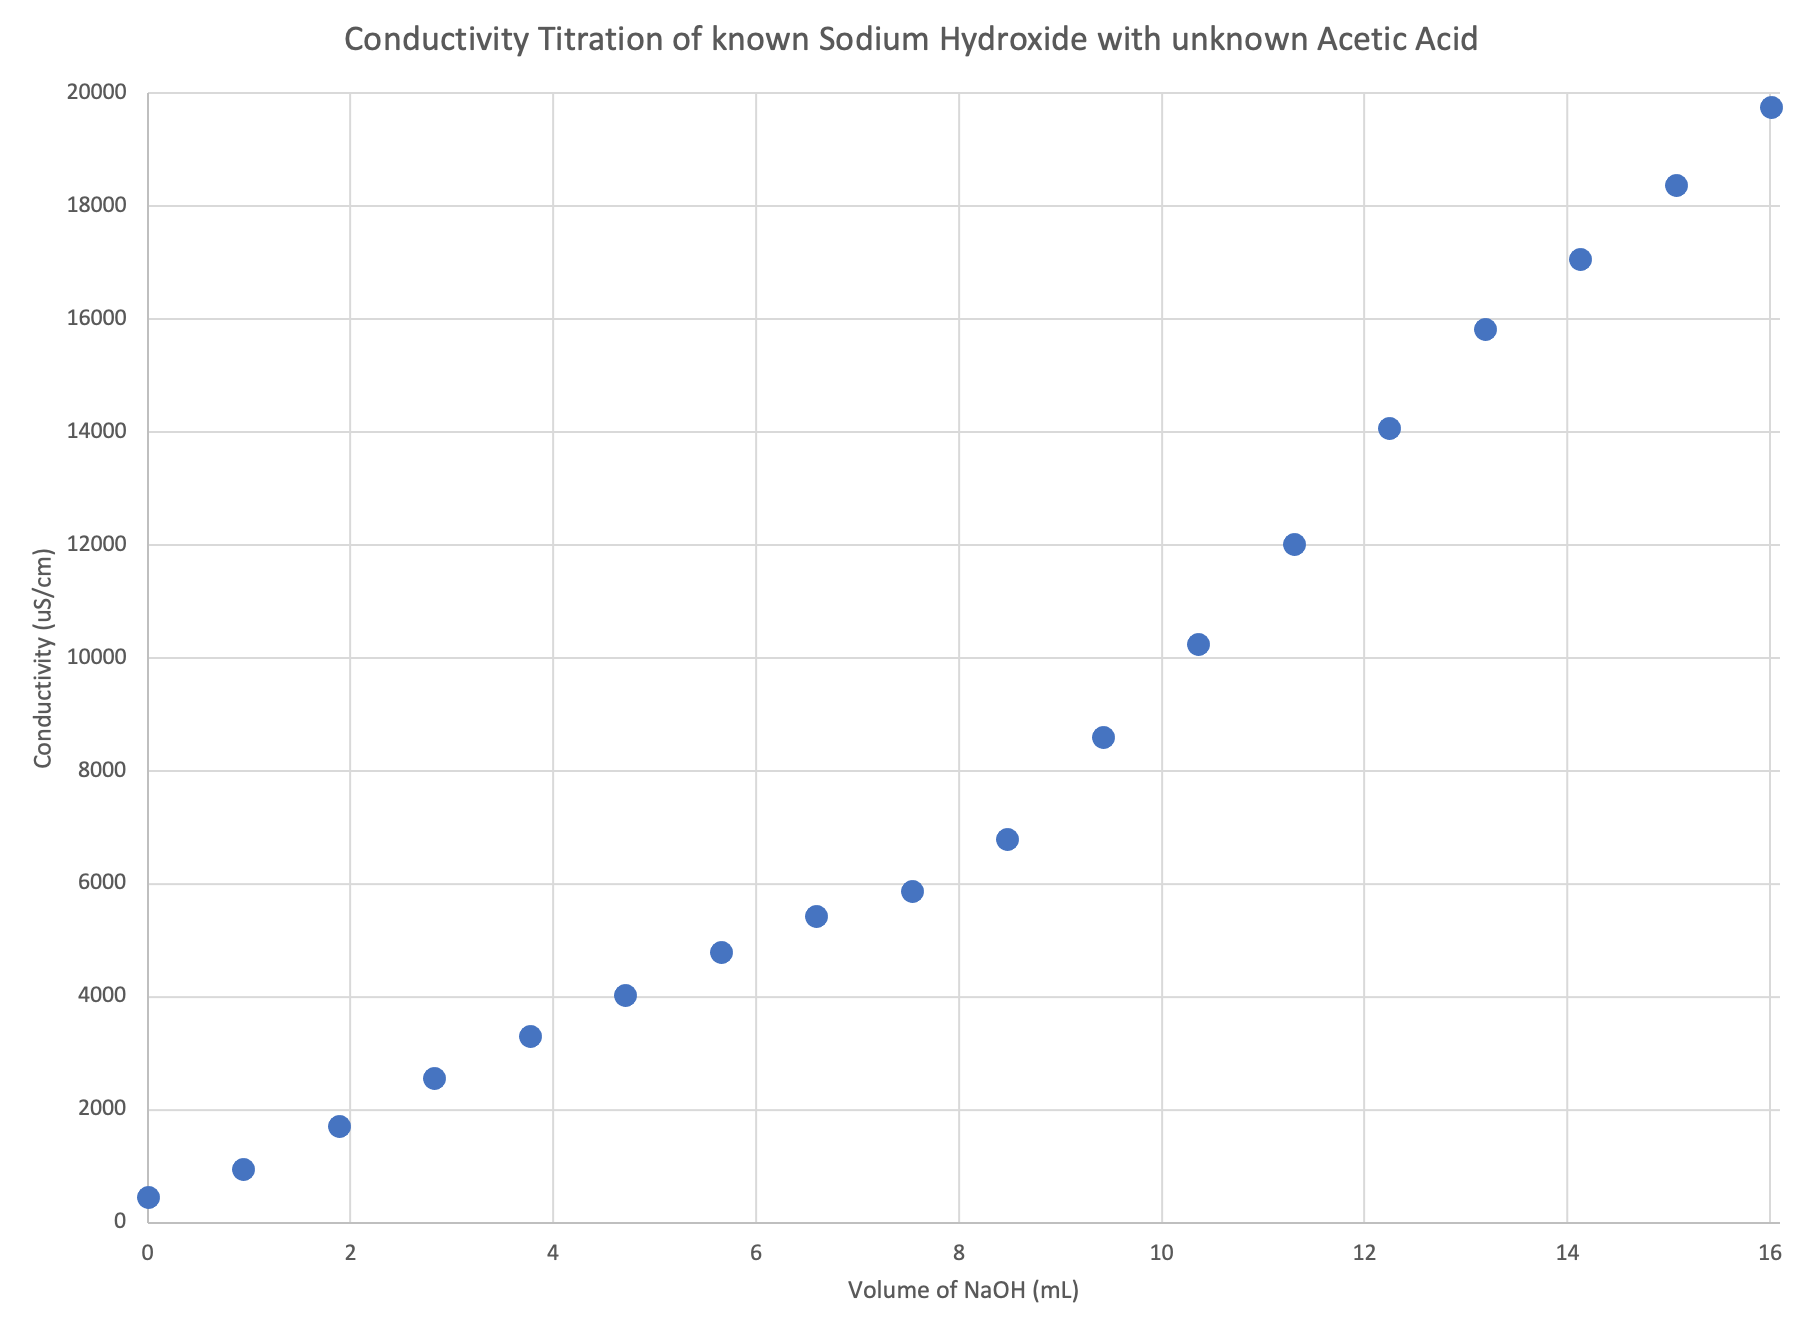 where you’ll notice that dramatic change in slope, a corner, is right around 8 mL. That is the equivalence point in this example. Your corner and hence mL of NaOH will be somewhere else depending on your sample of vinegar and the concentration of your NaOH solution.
 - Right at the corner is where the acetic acid and sodium hydroxide, the acid and base, are at equal molar amounts. Meaning, at the corner is where the reaction has reached the end or equivalence point. From the plot we can determine the equivalence point, or the volume of NaOH in the reaction vessel at the point equal to the CH3COOH, and we know the concentration of the NaOH, and we know the initial volume of CH3COOH added to the reaction vessel, then we can calculate the concentration of CH3COOH, turning an unknown into a known concentration.
Have a similar assignment? "Place an order for your assignment and have exceptional work written by our team of experts, guaranteeing you A results."